Unleash Your Inner Paparazzo: Nikon Z8 Takes Center Stage!

Say Cheese to Innovation: A Snapshot of the Nikon Z8

Buckle up, folks, because Nikon has unleashed a beast that's going to make you feel like a rockstar even if you're just snapping pics of your morning cereal. The Nikon Z8 is not your grandma's camera – unless she's one cool, high-tech grandma!

Imagine holding a camera that combines the elegance of a classic Nikon with the firepower of a space shuttle (okay, maybe not that much firepower, but you get the point). With a glorious full-frame sensor, this bad boy captures every nuance of your subject's eyebrow raise and every whisker of your pet's judgmental stare.

Megapixels That'll Make Your Jaw Drop

We're talking megapixels so abundant, you'll wonder if you've accidentally discovered the secret to photographing alternate dimensions. The Nikon Z8 brings a staggering number of pixels to the party, ensuring your photos are so detailed, you might just start noticing the meaning of life hidden in your shots.

Speedy Gonzales Ain't Got Nothin' on This

Ever felt like your camera was playing catch-up with your artistic vision? Well, kiss those days goodbye! The Nikon Z8 has an autofocus system so snappy, it could probably track a caffeinated squirrel jacked up on energy drinks. Whether you're capturing a cheetah on the hunt or your friend's mid-blink glam, this camera will have your back.

Low Light? More Like Glow Light!

Raise your hand if you've ever tried to capture a mesmerizing sunset, only to end up with a pixelated orange blob? Fear not, because the Nikon Z8 is here to conquer low light like a fearless vampire hunter armed with a stake and a UV flashlight. With its low-light wizardry, you'll turn dimly lit scenes into frame-worthy masterpieces.

So User-Friendly, Even Your Dog Could Use It (If They Had Thumbs)

Now, let's not forget about user-friendliness, because nobody's got time for a camera that's harder to operate than assembling IKEA furniture. The Nikon Z8 comes with a touchscreen that's more intuitive than a universal language made entirely of emojis. You'll be navigating settings and snapping shots faster than you can say "cheeseburger."

In a Nutshell: The Nikon Z8 Is Lit (Literally and Figuratively!)

So there you have it, folks! The Nikon Z8 isn't just a camera – it's your creative partner in crime, your photography sidekick, your passport to a world where pixels party like there's no tomorrow. With its mind-boggling megapixels, lightning-fast autofocus, and low-light sorcery, it's time to say hello to your new best friend in the world of photography.

Whether you're a seasoned pro or a newbie armed with nothing but enthusiasm and a collection of hilarious cat costumes, the Nikon Z8 is here to turn your snapshots into visual masterpieces. So grab that camera strap, step into the spotlight, and let the Nikon Z8 take your photography game from "meh" to "OMG!"

Happy snapping, you pixel prodigies! 📸🎉

Want to get one of these bad boys?!? Click here to experience it for yourself!:

I NEED THE NIKON Z8!

Pros of the Nikon Z8

1. High resolution: The Nikon Z8 is rumored to boast an impressive sensor resolution, allowing for incredibly detailed images with rich colors and exceptional clarity.
2. Full-frame sensor: As a full-frame mirrorless camera, the Nikon Z8 is expected to deliver superior image quality, enhanced low-light performance, and a shallow depth of field, making it ideal for professional photographers.
3. Improved autofocus system: With an advanced autofocus system, the Nikon Z8 is likely to offer faster and more accurate focusing, allowing photographers to capture sharp images even in challenging shooting conditions.
4. In-body image stabilization (IBIS): IBIS technology provides stability to compensate for camera shake, enabling photographers to shoot handheld in low light or with longer focal lengths without sacrificing image quality.
5. 4K video capabilities: The Nikon Z8 is anticipated to offer high-quality 4K video recording, allowing videographers to capture stunning cinematic footage with great dynamic range and detail.
6. Enhanced connectivity: Built-in Wi-Fi and Bluetooth capabilities enable seamless wireless transfer of images and remote control of the camera, facilitating workflow efficiency and sharing images on the go.
7. Weather sealing: Professional-grade cameras like the Nikon Z8 are expected to have robust weather sealing, protecting the camera from dust, moisture, and even extreme weather conditions, increasing its durability.

Cons of the Nikon Z8

1. Price: Considering its high-end specifications, the Nikon Z8 will likely come with a hefty price tag, making it less accessible to amateur photographers or those on a tight budget.
2. Limited lens selection: Although Nikon's lens lineup for its Z-mount mirrorless cameras is expanding rapidly, it may still offer a more limited range of lenses in comparison to the well-established F-mount lens system.
3. Short battery life: Mirrorless cameras tend to consume more power due to the constant use of electronic viewfinders and live preview. The Nikon Z8 might face similar limitations, requiring additional batteries or backup solutions for prolonged shoots.
4. Learning curve: Switching from a DSLR to a mirrorless camera like the Nikon Z8 may require some adjustment for photographers unfamiliar with the electronic viewfinder and new menu systems. Adapting to new controls and features can take time.
5. Possible overheating issues: Mirrorless cameras are prone to heat buildup during extended video recording or continuous shooting sessions. It remains to be seen if the Nikon Z8 can effectively manage heat dissipation to avoidHey there, photography enthusiasts and selfie extraordinaires! Are you ready to dive into the marvelous world of the Nikon Z8? Hold onto your lenses, folks, because we're about to embark on a pixel-packed journey that'll make your Instagram followers swoon and your photography pals green with envy!

Get a Nikon Z8

Nikon Z8

From High Fashion to Beauty: A Guide to Different Types of Modeling Images

As a model, you may encounter different types of modeling images that you'll need to be familiar with. Knowing the differences between these types of images can help you understand what is required of you during a photo shoot and how to pose and present yourself in front of the camera. In this blog, we'll explore the four main types of modeling images: high fashion, commercial, editorial, and beauty, and provide examples to illustrate each type.

1. High Fashion Images

High fashion images are often considered the most glamorous and prestigious type of modeling images. They are typically used in high-end fashion magazines, designer campaigns, and runway shows. These images often feature avant-garde designs, bold colors, and intricate details. High fashion models are usually tall and slender, with a unique and striking appearance. In high fashion images, the focus is on the clothes, the model's pose, and the overall mood of the image.

Example:


2. Commercial Images

Commercial images are used to promote a product or service and are often seen in advertisements or catalogs. Commercial models are expected to showcase the product in a way that is relatable to the target audience. These images often feature models of different ages, sizes, and ethnicities. In commercial images, the focus is on the product, the model's expression, and the overall message of the image.

Example:


3. Editorial Images

Editorial images are used in magazines, newspapers, and other publications to accompany articles or news stories. They often feature a more artistic and interpretive style, with the model portraying a character or telling a story. Editorial models are expected to convey emotion and personality through their poses and expressions. In editorial images, the focus is on the story, the mood of the image, and the overall message of the publication. Editorial photography is a type of photography that aims to tell a story or portray a concept.

Example:


4. Beauty Images

Beauty images are used in the beauty industry to showcase makeup, skincare products, and beauty tools. These images often feature close-up shots of the face or specific features, such as lips or eyes. Beauty models are expected to have flawless skin and features, and to showcase the product in a way that is aspirational to the viewer. In beauty images, the focus is on the product, the model's features, and the overall mood of the image.

Example:


In conclusion, understanding the different types of modeling images and their intended purposes is important for succeeding as a model. High fashion images convey luxury and sophistication, commercial images aim to sell products or services, editorial images tell a story and convey emotion, and beauty images showcase the results of cosmetics and beauty products. By being aware of the different types of modeling images, you can better prepare for photo shoots and deliver the desired look and message.


So you want to climb?!?

Climbing is something I enjoy doing when I’m not shooting, wanting to explore a new place or as an alternative to going to the gym. If you’re like me, you do NOT want to look at the same four walls all the time. So sometimes I go climbing just to get out of my space, get some fresh air and see something new and different.

Climbing is extremely fun, challenging, exciting, and also pretty dangerous. A lot of the dangers of climbing can be overcome with the proper gear.


HARNESS / SADDLES

The first thing you’re going to need is a harness or saddle. I have both a tree climbing harness and a rock climbing one. A rock climbing harness is light weight, flexible, and doesn’t have a lot of gear loops on it. It’s best used for when you are grabbing onto a mountain side, rock face, indoor rock climbing, or anything else where using your hands and feet to do the act of pulling yourself up. For rock climbing, the harness is basically a seatbelt. It’s there for you, snuggle on your waist and legs just in case you slip or fall.

A tree climbing harness (or tree saddle) is a little different. When tree climbing, you are sitting in the harness, almost like being carried up in it. Tree harness’s are much more comfortable. Because you are mostly sitting in it, they typically have much more padding, adjustable straps, and more gear loops. You still use your hands and feet when tree climbing BUT, you are still in a seated position most of the time. Your arms do most of the work, unless you’re using a foot ascender, which we will cover in a minute.


ROPES

Now that you have your harness, you need something to keep you locked onto that rock ledge or big tree. That’s right, you need a rope. The ropes I like to use are dynamic ropes. Meaning they have some stretch or give to them. Static ropes will work just fine but, if you were to slip or fall, the static rope has no give to it. It would be a much more abrupt stop and there would also be more risk of a line snap. If you’re searching for which rope is right for you, most places you can order from give good descriptions of the rope and its features. I personally like the “dry core” ropes. Ropes come in all different colors and diameters. The color you’re seeing is the outside sheath of the rope. The interior of the rope is made of strands of fibers. “Dry core” rope means that the interior fibers and the outside sheath have a water repellant treatment them. These ropes are just a little more expensive then non dry or dry ropes. But I like to climb waterfalls so I use the dry core.


THROW BALL / LINE

Now you need some way to get your rope up into that beautiful tree. A throw ball and some throw line should do the trick. Here I’d say do whatever you’re most comfortable with. I use a 10-14oz throw ball with a 1.75mm throw line. You swing, chuck, throw, launch your throw ball (tied to your throw line) up into a big stable branch or over whatever your climbing. The throw ball will come down the other side, untie the throw ball and tie your climbing rope to your throw line. Then you simply pull your climbing rope back toward you using your throw line. Once you have your climbing rope over your branch, you can secure it to the tree trunk for climbing.


ASCENDER / DESCENDER / GRIGRI

So what do you connect your rope to your harness with? There are several options for this too. If you are wanting to hike up somewhere and simply repel down, you could use a figure 8 descender. Please note that a figure 8 is a manual tool, and YOU are in full control of your decent. If you let go of your rope, you will fall.

If you want to have a slow and safe decent, you would need an auto braking device. The most common of these is a grigri. With a grigri you can repel down and fully let go of everything and it will hold you in place. A grigri can also be used in climbing for both rock and tree. In tree climbing, the grigri is directly connected to your harness, it IS your seatbelt.


CARABINER

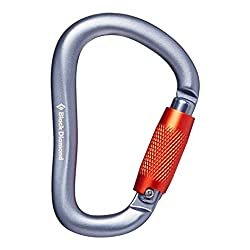
One thing you should never be without, a handful of carabiners. The carabiner can be used for loads of things. Mainly, connecting all your gear together. Like connecting your grigri to your harness. Or connecting a pulley to a hand ascender. Whenever I climb, I always bring more than I think I will need. In my opinion you can’t have enough.


RAD / SRT

RAD SRT climbing

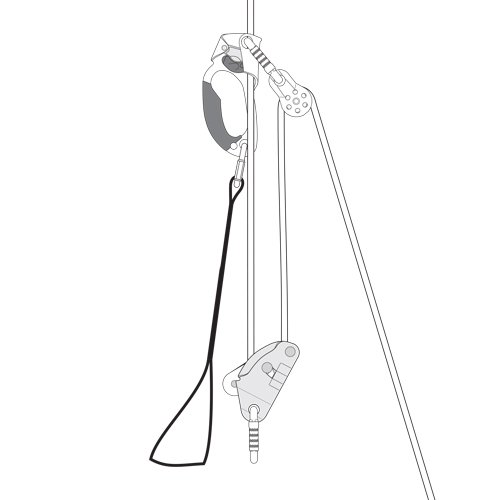
To have a safe tree climbing session, you need your harness, rope and a hand ascender. These are the basics to creating a RAD system. RAD stands for Rapid Ascent / Decent. SRT is another term you might hear and that stands for Single Rope Technique. Tree climbing is often SRT using a RAD system.

A RAD system is a hand ascender, a pulley, and your grigri. After you put your rope through the grigri and attach it to your harness, you can then clip your hand ascender onto the rope, (about a foot above the grigri). Next you’ll need a small pulley to clip onto the hand ascender, which you will feed your slack line through. With one hand on your hand ascender and the other on your slack line (pulled through the pulley on your hand ascender) you can pull yourself up safely and the grigri will lock you into place.

You can add a foot loop to the hand ascender, it acts like a step for when you’re pulling yourself up. Now you’re at the top of the tree and you’ve eaten your sandwich, taken some photos or whatever you’re wanting to do up there… how do you get down? You never NEVER mess with your grigri once you’ve started climbing. That is your safety. DO NOT UNCLIP IT FROM YOU HARNESS until you are safely on the ground. To get down safely, simply take off your pulley, foot loop, and hand ascender (clip them to your harness). Now you are just dangling, free to come on down! You’d gently pull back on the grigri handle and you’ll begin to slide smoothly down your rope. If you go too fast you can just let go and the grigri will do its auto braking magic and you’ll come to a safe stop and be just fine.


Once you’re all the way back on the ground you can unclip your grigri, pack up your gear and go show someone the awesome photos you just took. All while having your favorite beer. Or maybe some tacos.


If you want to know the ACTUAL gear I use to climb and stay safe, here are some links to what I use.

Hope to see you out there!

GEAR I ACTUALLY USE

HARNESS-

Black Diamond: https://amzn.to/3F3jlb1

Petzl: https://amzn.to/31wPSZk

ROPE-

Beal: https://amzn.to/31yR7aB

THROW BALL / LINE-

NOTCH: https://amzn.to/3zxzi8r

ASCENDER / GRIGRI-

HAND ASCENDER: https://amzn.to/3eWv4O2

GRIGRI: https://amzn.to/3f0ZLS9

CARABINERS-

https://amzn.to/31DXvNS (I would recommend at least 4)

PULLEY-

Petzl: https://amzn.to/3t5DfQr

FOOT LOOP-

Petzl: https://amzn.to/3zMu5K9

HELMET-

BLACK DIAMOND: https://amzn.to/3qX1gGM


YOU MADE IT!

You made it here!

now what?

nothing…. because we are still under construction!

now heat up a frozen pizza and relax.